
5 Common Guitar Wiring Mistakes (& How to Avoid Them)
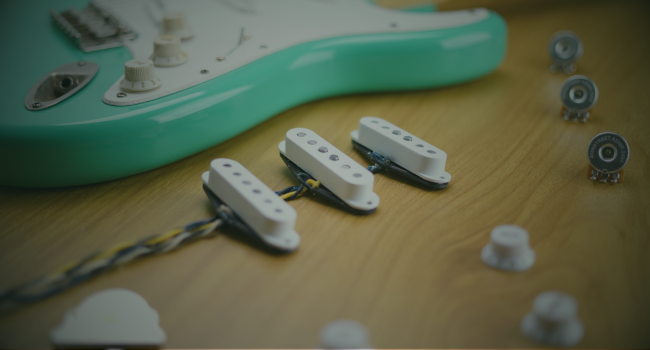
So, you’ve picked up a new set of Gunstreet pickups or a premium wiring harness, plugged in your soldering iron and cracked open your guitar, ready to mod like a pro. Ten minutes later you’re faced with a broken pot shaft, a knob that won’t budge, a few unsightly globs of solder, and a big, sad, buzzing mess.
Welcome to the club!
Guitar electronics are fun—until they’re not. Most of us who have learned what not to do did so the hard way. Consider this to be your friendly guide to avoiding the most common wiring potholes (pun intended).
Whether you’re brand new to wiring or need to refresh your memory, here are five tips that’ll save your gear – and maybe your sanity.
1. Don’t Hulk Out on Your Pots
It sounds obvious: tighten the pot nut until it’s snug. But “snug” is a relative term. Do we mean finger-tight or cranked down like you’re fixing a tire??
The hard way: Grab a wrench, go full torque, and snap—bye bye shaft. Even worse, the whole pot spins uselessly in place. That’s a wasted pot and an absolute headache to remove.
The easy way: Pot shafts are made of soft metal—brass or even cheaper alloys. Tighten the mounting nut just enough to keep the pot from spinning when you turn the knob. A gentle hand-tightening followed by a small twist with pliers (less than 40 degrees) is all you need. Promise!

2. The Wrong Knob Can Wreck Your Pot
Knobs may seem like they’re a dime a dozen, but if they don’t match your pot shaft, you can ruin both parts in mere moments.
The hard way: You’ve found a knob that miraculously ties your entire project together. From an aesthetic standpoint, it’s the knob of your dreams. You attempt to install it on your pot’s shaft, but it’s not going on easy. Maybe it’s a fine-spline knob on a coarse-spline shaft. Maybe it’s a 6mm solid shaft knob on a ¼” pot. Either way, you apply too much pressure and either bend the pot base or snap the shaft clean off.
The easy way: Match your knobs to your pots. There are two main types:
Solid Shaft (6mm or ¼"): Needs knobs with set screws.
Split Shaft (Coarse or Fine Spline): Needs push-on knobs that match the spline pattern.
Take 30 seconds to confirm the fit. It’ll save you a lot of swearing later.

3. Swapping Pickups? Check the Phase
You’ve wired in your new boutique pickup. You flip to the middle position and it sounds… weird. Thin. Hollow. Weak. In the words of a dad who’s resigned himself to their kid’s obsession with nu-metal: “Let’s hope it’s just a phase….”
The hard way: You figure all the pickups in your project are wired the same and will play nicely together. They’re not, and they won’t.
Different brands and models use different winding directions, magnetic polarities, and color-coding on their ground and hot leads. And if you inadvertently select two pickups that are out of phase, they cancel each other out.
The easy way: Always check phase compatibility when mixing or replacing pickups.
Choose the right leads: Pickups with multiple conductors (2-conductor for single coils, 4-conductor for humbuckers) give you flexibility to flip phase if needed.
Flip the hot and ground wires: If you suspect a phase issue, try swapping these (but always ground the bare/shield wire).
Ask the manufacturer: Reputable pickup makers will provide info on their magnet and winding directions if it’s not already listed on their site.
Bonus: You’ll sound smart when someone mentions Peter Green.

4. A Cheap Soldering Iron Will Ruin Your Day...and More!
There are places where it’s cool to cut costs. A hot soldering iron isn’t one of ‘em. Don’t skimp here. A $10 iron might work— but it’s unlikely to excel.
The hard way: An underpowered iron takes forever to heat up, can’t hold a stable temperature, and creates cold solder joints that look terrible and fail randomly. It also produces solder blobs the size of Everest and can overheat other sensitive components while you’re trying to make a simple joint.
The easy way: Allocate some cash towards a good soldering iron with adjustable temperature control. Add quality 60/40 tin-lead rosin-core solder and you’re golden. If you're stuck with lead-free solder, crank the temp a little higher.
A good iron heats fast, holds temperature, and gives you clean, solid joints that won’t flake out. It’s also a must if you want your work to look as good as it sounds.

5. Not All Buzz is Created Equal
You’ve wired everything perfectly—but there’s still a hum. Is it a mistake? Maybe. Or maybe that’s just how electric guitars work.
The hard way: After spending the time and effort to upgrade your guitar, every bit of extraneous noise rings out like a portent of failure and doom. Not taking any chances, you decide to start from the top and rewire everything…only to realize it was your dimmer switch or laptop charger all along.
The easy way: Use a checklist to rule out real issues:
Ground continuity: Use a multimeter in continuity mode to test all ground points—pots, jack sleeve, bridge, pickup grounds. You want near-zero resistance between them.
Shielding: Use copper tape or shielding paint in your cavities, and be sure to connect the shielding to ground with a jumper wire. If not, you just built a noise antenna.
Still getting hum? Consider the source:
Single coils hum. Period: They’re basically antennas. Think of it as vintage charm!
More gain = more noise: Cranking your amp or distortion will amplify every little buzz.
Cables and power matter: Old patch cables, bad power supplies, and noisy pedals or amps all add to the racket.
Where are you?!: Pickups are sensitive creatures when it comes to environment.
If you happen to be playing in an antique lamp store, there’s a very good chance your pickups are tuning in to some electromagnetic interference. Same if your practice session is taking place in a small room with fluorescent lighting, your phone/tablet’s sitting right by your rig, etc. etc.
The goal is to isolate excessive, weird, or unwanted noise—like crackling pots or overall volume drops. If it's just a faint hum near your monitor, relax. You're playing an electric guitar, and that’s quiet enough for rock ‘n roll!
Wrap-Up: Learn From Our Mistakes
These five tips could save your next project from going sideways. Most wiring mistakes don’t come from a lack of tools—they come from not knowing what to look out for. Clear eyes, hot solder, can’t lose.
So grab your iron, double-check your knobs, and get modding. And hey, if you break something? You’re in good company. That’s how the rest of us learned, too.
Made these mistakes? Found your own ways around 'em? Let us know below!
Read more
Introducing our new PRS line of kits
We are happy to introduce our new and heavily requested PRS style kits. 6 all new kits with some cool features Gunstreet PRS Classic Solderless Wiring Harness Sold out ...
Read more
The Perfecto De Castro Signature HSS Wiring Harness
Legendary rock guitarist Perfecto De Castro has helped design a powerhouse wiring kit for Gunstreet’s HSS Super‑Strat platform.
Read more
3 comments
I am guilty of destroying a few CTS’s pots in my time. The last one I tried installing my Epiphone knobs and pushed the backing clean off! haha.
Greg
Good reminder of how easy it is to make mistakes. Taking my components to a well experienced electronics pro. To solder components.
James Balmer
And….start soldering with a clean tip. Tin it first! Keep it clean throughout each soldering operation with fresh tinned solder. shut it off only after re-tinning it.
this alone will save you many a headache wondering why your million degree iron isn’t melting solder correctly.
Everyone was a noob at some point and some noobs don’t have the benefit of a mentor. Some of us learnt this the hard way, before youtube or smartphones or even computers.
That is all….
CRJohnson
Leave a comment
This site is protected by hCaptcha and the hCaptcha Privacy Policy and Terms of Service apply.